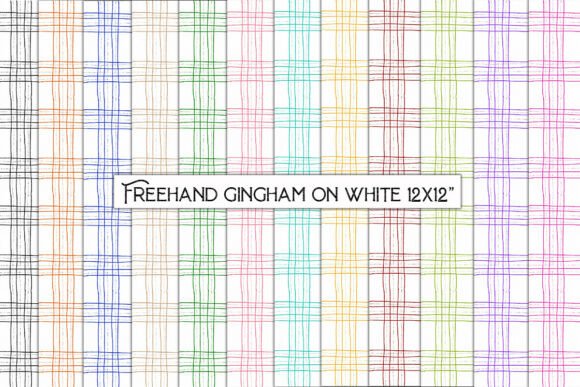
Freehand Gingham on White
If you’ve ever scrolled through design marketplaces and paused at a gingham pattern—only to skip it because it felt too stiff, too digital, or too generic—you’re not alone. Most gingham graphics rely on rigid grids and perfect symmetry, which can unintentionally mute warmth and personality. Freehand Gingham on White breaks that mold. It’s not just another repeat pattern—it’s an organic, hand-drawn interpretation of gingham, created with intentional imperfection: slight line variations, subtle wobbles, and gentle spacing shifts that echo the rhythm of a human hand at work. That authenticity makes it breathe differently on screen and in print—and explains why creators across disciplines are reaching for it again and again.
Why “Hand-Drawn” Isn’t Just a Buzzword Here
Many designers assume “hand-drawn” means scanned ink on paper—but that’s only half the story. With Freehand Gingham on White, the drawing process was deliberate and tactile: each line laid down with pressure-sensitive tools, then refined digitally *without* over-smoothing. The result? A pattern that retains texture, variation, and quiet movement—qualities that vanish when algorithms auto-align or vectorize. This matters most when scaling up: printed wallpaper won’t look sterile, gift wrap won’t feel mass-produced, and junk journal pages won’t compete visually with your ephemera. It’s season-neutral not because it’s bland, but because its natural rhythm works equally well with spring florals, autumnal layers, or minimalist winter palettes.
A Common Misstep: Assuming Resolution Equals Versatility
Yes, this file delivers 3600 × 3600 px at 300 dpi—and yes, that’s excellent for large-format printing. But some users download it expecting seamless scalability *across all use cases*, only to discover limitations later. For example: stretching the full 12-inch square tile across a 48-inch wall mural without checking how the repeat aligns—or assuming the JPG format will hold up in layered Adobe Illustrator workflows where transparency is needed. Neither is wrong, but both require awareness.
Here’s what to check before downloading or deploying:
- File format fit: JPG works beautifully for wrapping paper, wallpaper, and scrapbook backgrounds—but if you plan to cut intricate die-lines in Cricut Design Space or layer over photos in Canva, consider whether you’ll need transparent edges (which JPG doesn’t support).
- Tile behavior: Though designed as a seamless repeat, subtle hand-drawn variance means edge alignment isn’t mathematically exact like a vector grid. Test a 2×2 tile mockup in your layout software first—especially for large-scale wall applications.
- Color context: “White” here refers to the background—not pure #FFFFFF. It’s a soft, warm off-white that prevents harsh contrast against cream cardstock or natural linen. If your project demands stark brightness (e.g., high-contrast branding), preview the file against your intended substrate first.
Overlooking the Power of Restraint
Because Freehand Gingham on White feels so inviting and versatile, it’s easy to overuse it—layering it behind text, framing photos with it, and using it as both background *and* border in the same layout. That instinct comes from enthusiasm, not error—but visual fatigue sets in faster than expected. Human eyes seek contrast and hierarchy. When every surface carries the same delicate rhythm, nothing stands out—including your message, your product photo, or your handmade sentiment.
A better approach? Use it intentionally. Try one of these grounded examples:
- As a subtle envelope liner—printed on lightweight 80gsm paper, then tucked behind kraft or cotton rag envelopes. The gingham stays hidden until opened, adding quiet delight.
- In negative space: Print your greeting card’s main illustration on white cardstock, then run a single strip of Freehand Gingham on White along the bottom edge as a grounded anchor—not a full background.
- For origami bases: Cut squares at 6×6 inches and fold into modular units. The hand-drawn lines subtly guide creases without competing with the geometry.
What “12 Files – Zipped” Really Means for Your Workflow
The package includes twelve unique tiles—not twelve versions of the same image. Each one captures a different moment in the drawing process: slight shifts in line weight, spacing, or density. Some lean denser; others open up more air. That variety is intentional, not redundant. Yet many users extract just one tile and never explore the rest—missing opportunities for visual pacing across multi-page journals, staggered gift wrap sets, or evolving social media templates.
Instead of defaulting to Tile #1, try this:
- Assign each tile a role: one for headers, one for dividers, one for corner accents.
- Use three distinct tiles across a six-page junk journal spread—letting rhythm evolve naturally, like turning real pages.
- Combine two adjacent tiles side-by-side in Photoshop, then apply a soft gradient mask to blend them. You’ll create a custom transition no algorithm would generate.
Final Thought: Match the Pattern to Your Purpose—Not Just Your Aesthetic
Choosing Freehand Gingham on White isn’t about picking “the prettiest gingham.” It’s about selecting a tool that supports your intention: calm cohesion for a wellness brand’s packaging, tactile warmth for a teacher’s classroom resources, or quiet sophistication for a small-batch stationery line. Its strength lies in how it behaves—not just how it looks.
Before committing, ask yourself: Will this help me communicate more clearly? Will it make my physical product feel more considered? Does it simplify my design process—or add thoughtful complexity? If the answer lands in the affirmative for at least two of those, you’re choosing wisely. And if you find yourself returning to it across seasons, projects, and platforms? That’s not coincidence. It’s the quiet reliability of something made by hand—with room for you to do the same.